A microwave diode is a semiconductor device specifically designed to operate efficiently at microwave frequencies. These diodes are critical components in microwave circuits and systems due to their ability to handle high-frequency signals effectively. Here is an overview of microwave diodes:
Microwave Diode Overview:
-
Purpose: Microwave diodes are used in microwave circuits for various functions such as signal mixing, detection, modulation, amplification, and frequency multiplication.
-
Frequency Range: Microwave diodes are designed to operate in the microwave frequency range, typically from hundreds of megahertz (MHz) to several gigahertz (GHz).
-
Types of Microwave Diodes:
- Schottky Diodes: Known for their fast switching speeds, low forward voltage drop, and suitability for high-frequency applications.
- Gunn Diodes: Used in microwave oscillators and amplifiers due to their unique negative differential resistance characteristic.
- Impatt Diodes: Employed in high-power microwave circuits for applications like radar systems and communication equipment.
- Varactor Diodes: Used for frequency tuning in microwave circuits and are voltage-variable capacitors.
-
Key Features:
- High-Speed Operation: Microwave diodes are optimized for fast switching speeds, crucial in high-frequency applications.
- Low Noise: Important for maintaining signal integrity in sensitive microwave circuits.
- High Power Handling: Some microwave diodes are capable of handling high power levels, making them suitable for demanding applications.
-
Applications:
- Microwave Oscillators: Generating microwave signals for communication systems and radar.
- Detectors and Mixers: Converting and processing microwave signals for various applications.
- Amplifiers: Boosting signal strengths in microwave circuits.
- Frequency Multipliers: Generating harmonics of input frequencies for specific applications.
-
Design Considerations:
- Impedance Matching: Ensuring proper impedance matching between the diode and surrounding components is crucial for efficient operation.
- Temperature Stability: Maintaining stable performance across temperature variations is essential for reliable operation in microwave systems.
- Power Handling: Selecting diodes based on their power handling capabilities to prevent damage in high-power applications.
-
Manufacturers: Various semiconductor manufacturers produce microwave diodes tailored for different applications, including MACOM, Infineon, NXP, and others.
Microwave diodes play a crucial role in enabling the functionality of microwave circuits by providing efficient signal processing, amplification, and frequency manipulation at high frequencies. Their specialized design and characteristics make them essential components in various microwave systems used in telecommunications, radar systems, satellite communication, and other high-frequency applications.
How to Test Microwave Diode
Testing a microwave diode requires specialized equipment and procedures due to the high frequencies at which these diodes operate. Here is a general guide on how to test a microwave diode:
Equipment Needed for Testing:
- Microwave Power Source: An RF signal generator capable of producing microwave frequencies.
- Microwave Power Meter: To measure the power output of the diode.
- Oscilloscope: For observing the waveform and characteristics of the microwave signal.
- Probe Station: To facilitate physical access to the diode under test.
- DC Power Supply: To bias the diode if necessary.
Steps to Test a Microwave Diode:
-
Biasing the Diode: Some microwave diodes require a bias voltage to operate correctly. Ensure you have the specifications for the diode to apply the correct biasing conditions.
-
Prepare the Test Setup:
- Connect the microwave diode to the probe station.
- Connect the diode output to the input of the power meter or oscilloscope for measurement.
- Ensure proper connections are made to the signal generator and power supply.
-
Initial Testing:
- Apply a low-power RF signal from the signal generator to the diode.
- Monitor the power output using the power meter to verify that the diode is responding to the input signal.
-
Performance Testing:
- Gradually increase the power level of the RF signal while monitoring the output.
- Use the oscilloscope to observe the waveform and characteristics of the signal passing through the diode.
- Check for proper rectification, frequency response, and signal integrity.
-
Characterization Testing:
- Measure the forward and reverse bias characteristics of the diode.
- Evaluate the diode's impedance matching with the test setup to ensure efficient power transfer.
-
Functional Testing:
- Test the diode in various operating conditions, such as temperature variations or different bias voltages, to assess its performance across different scenarios.
-
Comparison with Specifications:
- Compare the measured performance of the diode with its datasheet specifications to ensure it meets the required parameters.
-
Troubleshooting:
- If the diode does not perform as expected, check for issues such as improper biasing, faulty connections, or damaged diode components.
-
Documentation:
- Document the test setup, procedures, and results for future reference and troubleshooting.
Testing microwave diodes requires precise handling and attention to detail due to the specialized nature of these components. Following proper testing procedures and using the necessary equipment will help ensure accurate assessment of the diode's performance in microwave circuits.
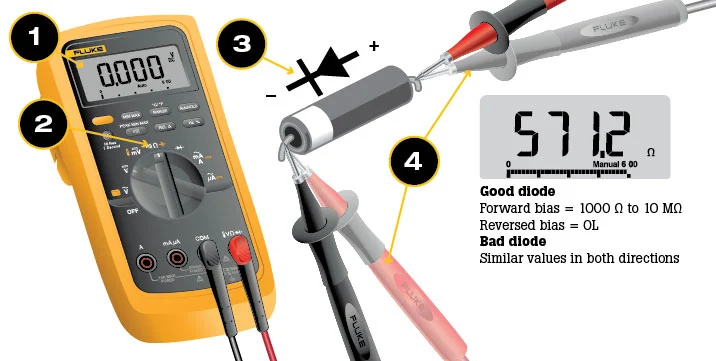
How to Test Microwave diode with Multimeter
.png)
Testing a microwave diode with a standard multimeter might not provide detailed insights into its high-frequency behavior or characteristics due to the limitations of typical multimeters. Microwave diodes operate at frequencies beyond the capability of most multimeters, which are designed for lower frequency measurements. However, you can perform some basic tests with a multimeter to check the diode's continuity and basic functionality. Here's a general guide on how to test a microwave diode using a multimeter:
Equipment Needed:
- Multimeter: Digital multimeters are commonly used for this purpose.
- Microwave Diode: The diode you want to test.
- Test Leads: The probes provided with the multimeter.
Steps to Test a Microwave Diode with a Multimeter:
-
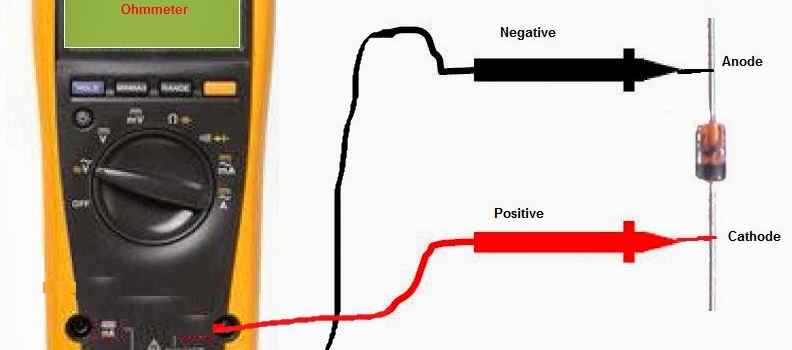
Continuity Test:
- Set your multimeter to the continuity or diode test mode (if available).
- Disconnect the diode from any circuits.
- Place the diode on a stable surface for testing.
- Identify the cathode (negative) and anode (positive) terminals of the diode.
- Touch the multimeter leads to the cathode and anode terminals of the diode.
- The multimeter should indicate a low resistance (or show continuity) in one direction and high resistance (or no continuity) in the reverse direction. This shows that the diode is functioning as expected.
-
Diode Test Mode:
- Some digital multimeters have a specific diode test function. Switch to this mode if your multimeter supports it.
- Connect the diode to the multimeter leads, observing the correct polarity (anode to positive lead, cathode to negative lead).
- The diode test mode typically shows the forward voltage drop across the diode, which can give you a rough idea of its functionality.
-
Reverse Bias Test:
- In the standard resistance measurement mode of the multimeter, you can also check the resistance when the diode is reverse biased.
- Connect the diode to the multimeter in reverse bias (anode to negative lead, cathode to positive lead).
- You should observe a high resistance or an open circuit condition, indicating that the diode is blocking current in the reverse direction.
Important Notes:
- The measurements taken with a multimeter are limited and may not fully characterize the behavior of a microwave diode at high frequencies.
- For comprehensive testing of microwave diodes, specialized RF test equipment like signal generators, power meters, and oscilloscopes are typically required.
- If the diode fails the basic tests with a multimeter, it may be defective. However, passing these tests does not guarantee proper functionality in microwave circuits.
While a multimeter can provide some basic insights into the continuity and basic functionality of a microwave diode, it is limited in assessing high-frequency performance and detailed characteristics. For more thorough evaluation of microwave diodes, specialized RF testing equipment is recommended.
How to Test Microwave diode with 9 Volt Battery
Testing a microwave diode with a 9-volt battery can allow you to perform some basic checks on its functionality. While this method won't provide detailed insights into its microwave performance characteristics, it can give you a general idea of whether the diode is functioning. Here is a simple guide on how to test a microwave diode using a 9-volt battery:
Equipment Needed:
- Microwave Diode: The diode you want to test.
- 9-Volt Battery: A standard 9-volt battery for testing.
- Alligator Clips or Wires: To make connections to the diode terminals.
- Optional: Multimeter: To measure continuity or voltage drop (for some basic additional checks).
Steps to Test a Microwave Diode with a 9-Volt Battery:
-
Prepare the Setup:
- Ensure the diode is isolated from any circuits or components.
- Identify the cathode (negative) and anode (positive) terminals of the diode.
- Keep the diode datasheet handy for reference, if available.
-
Basic Forward Bias Test:
- Connect the positive terminal of the 9-volt battery to the anode of the diode.
- Connect the negative terminal of the battery to the cathode of the diode.
- The diode should allow current to flow in the forward bias direction, typically resulting in a voltage drop across it.
- You can use a multimeter to check for a voltage drop or use a small LED in series with the diode to see if it lights up. This indicates current flow through the diode.
-
Reverse Bias Test:
- Reverse the connections of the battery to the diode (positive to cathode, negative to anode) to test the diode in reverse bias.
- A good diode should block current in the reverse bias direction and show a very high resistance or an open circuit.
-
Observations and Analysis:
- Note the behavior of the diode in both forward and reverse bias conditions.
- Check for any abnormal heating, odor, or physical damage during testing, which could indicate a faulty diode.
-
Additional Checks (if using a multimeter):
- You can perform continuity tests to verify the diode terminals and check for any short circuits or open circuits in both forward and reverse bias.
- Measure the voltage drop across the diode in forward bias to confirm its characteristic behavior.
Important Notes:
- This basic test with a 9-volt battery can indicate whether the diode conducts in the forward bias and blocks in the reverse bias direction.
- For comprehensive testing and understanding of the microwave diode's performance at high frequencies, specialized RF testing equipment is necessary.
Testing a microwave diode with a 9-volt battery can provide a simple way to check its basic functionality, although it won't fully characterize its high-frequency behavior. For detailed assessment of microwave diodes, you will need specialized equipment designed for high-frequency testing and analysis.
Signs of a Bad Microwave Diode
Identifying signs of a bad microwave diode can help troubleshoot issues in microwave circuits and systems. Microwave diodes are crucial components in these systems, and when they malfunction, certain indicators can help pinpoint potential problems. Here are some common signs that could suggest a microwave diode is faulty:
Signs of a Bad Microwave Diode:
-
No Power Output:
- If the microwave diode is responsible for power amplification or manipulation, a lack of power output could indicate a problem with the diode.
-
High Forward Voltage Drop:
- A significant increase in the forward voltage drop across the diode can suggest that it is failing or has deteriorated.
-
Reverse Conducting or Short Circuit:
- A microwave diode that conducts in the reverse bias direction or shows a low resistance path in both directions indicates a potential short circuit and is likely faulty.
-
No Current Blocking in Reverse Bias:
- A diode that does not block current in the reverse bias direction, allowing continuous flow, is likely malfunctioning.
-
Overheating or Physical Damage:
- Physical signs like overheating, burning smells, charred spots on the diode, or visible damage indicate a serious fault in the diode.
-
Voltage Spikes or Abnormal Voltage Levels:
- Unexpected voltage spikes or irregular voltage readings when operating the microwave circuit can point to issues with the diode’s rectification or regulation functions.
-
Inconsistent Performance:
- Fluctuating or inconsistent performance of the microwave circuit, especially when the diode is involved in signal processing or modulation, can suggest a diode problem.
-
Excessive Noise in Signals:
- If the microwave circuit exhibits increased noise levels or interference that cannot be attributed to other components, a faulty diode could be the cause.
-
Failure to Power On or Function Properly:
- In cases where the microwave system does not power on or function as expected, the diode could be a potential point of failure to investigate.
-
Failure to Tune or Frequency Shifts:
- Frequency-tuning diodes that fail to adjust frequencies as intended or cause unexpected shifts could indicate a malfunctioning diode.
-
Reduced Sensitivity or Signal Weakening:
- Reduced sensitivity in detection or amplification circuits, or weakening of signals passing through the diode, may indicate a fault in its functionality.
When experiencing any of these signs, it is advisable to consult technical documentation, perform specific tests using appropriate equipment, and potentially replace the diode if it is indeed determined to be faulty. Troubleshooting microwave diodes should be done methodically to ensure accurate diagnosis and resolution of any issues in the microwave system.
.jpg)
FAQs
1.What does a diode do in a microwave
In a microwave circuit, a diode serves several purposes:
-
Rectification: Diodes convert alternating current (AC) to direct current (DC), which is essential for powering microwave components.
-
Signal Mixing: Diodes are used in frequency mixing circuits to generate new frequencies, crucial for signal processing in microwave communication systems.
-
Switching: Diodes can act as switches, allowing or blocking the flow of microwave signals based on the applied voltage or current.
-
Detection: Diodes can detect microwave signals, converting them into measurable electrical signals in applications such as radar receivers.
2. Will a microwave work without a diode
A microwave won't work without a diode due to its crucial role in converting alternating current (AC) to direct current (DC), necessary for powering the magnetron, which generates microwaves.
Additionally, diodes facilitate safety features like preventing capacitor discharge back into the power supply and protect other components from damage.
Without a diode, the microwave's circuitry would be incomplete, leading to improper operation or failure.